BIOS and UEFI
Before we proceed with the installation, there are two boot modes that we need to understand, they are determined by whether your Windows or whatever operating system (OS) is using the UEFI (Unified Extensible Firmware Interface) or traditional BIOS (Basic Input-Output System). Understanding which boot mode to apply is critical for creating a bootable USB stick that you want to use to install the Ubuntu Desktop alongside with other OS, such as Windows. Both UEFI and BIOS are low-level software that starts when you boot your personal computer (PC) before booting your operating system, and they offer accessible interfaces that we can use to change various system settings, such as modifying boot order, tweaking overclocking options, locking down a computer with a boot password, enable virtualization hardware support, and manipulate other low-level features.
BIOS is a type of firmware usually stored on a chip of a computer's motherboard. As soon as you start your computer, BIOS is the first thing that loads, it then initializes (wakes up) and configures (checks their validity and proper/correct functioning) of your computer's hardware components before booting an operating system (usually from your hard drive although it is possible to boot from another device), it then runs the bootloader that boots the respective computer's OS. UEFI is the successor to the legacy BIOS which offers several modern features, for example, only systems with UEFI firmware support Secure Boot which secures the boot process against rootkits. This means the operating system can be checked for validity to ensure no malware has tampered with the boot process.
The Extensible Firmware Interface (EFI) or its version 2.x variant, Unified EFI (UEFI) is a firmware type that is becoming more common to modern computers. It supports larger hard drives (BIOS can only boot from drives of 2.1 TB or less, the UEFI firmware can boot from drives of 2.2 TB or larger, the theoretical limit is 9.4 zettabytes), faster boot times (because UEFI can run in 32-bit or 64-bit mode and has more addressable address space than BIOS), more security features, convenience in graphics and mouse cursors, and support for more than four partitions on a drive, see reference. It is intended to replace the traditional BIOS firmware that is prevalent on earlier machines. Some modern computers support both UEFI mode and BIOS mode, but, which boot mode to use depends on several factors as we shall see later.
The BIOS will end soon, Intel, for example, has announced plans to completely replace it with UEFI on all their chipsets by 2020.
Some recent computers that ship with UEFI only may refer to it as the BIOS to avoid confusion to people who are used to the most familiar BIOS, but, it is apparent that a large number of modern personal computers today ship with UEFI firmware instead of a traditional BIOS.
How to Access BIOS or UEFI Firmware Settings
You can access the BIOS firmware settings screen by pressing a specific key as your computer starts/boots up, depending on the computer model. In any case, it needs restarting your machine. Commonly used keys include Escape, F1, F2, F10, F11, F12, Ctrl+Alt+Escape or Delete. Some computers with UEFI firmware also require you to press one of these keys during the boot-up process to access the UEFI firmware settings screen. However, most computers will indicate which key to press in order to access BIOS/UEFI settings during the boot-up process by displaying a message such as "Press F2 to access BIOS", “Press DEL to enter setup”, or something similar to that, see the attached image below. The exact key to press can be found by consulting the respective PC's manual.

In some cases, for example, for PCs that run Windows 8 or 10, you may need to access the UEFI settings screen through the Windows boot options menu rather than pressing a key while your computer starts/boots. To access it, hold down the Shift key as you click the Restart option to restart your PC and reboot into a special boot options menu. Then select Troubleshoot -> Advanced Options -> UEFI Firmware Settings to access the UEFI firmware settings screen as shown below.

You can access and change the BIOS/UEFI boot options and save them -- they will be saved to the memory on the computer motherboard, then restart your computer for changes to take effect. When you boot the computer next time, the BIOS/UEFI will configure your PC with the saved settings. Most UEFI implementations provide BIOS emulation so that you can choose to install and boot old operating systems that expect a BIOS instead of UEFI, hence they’re backward compatible, see reference.
You can also select a “Discard Changes” option to restart your PC without saving any of the changes you made. If you have a problem after making a change, you can return to your BIOS or UEFI firmware settings screen and undo all your changes using an option named something like “Reset to Default Settings” or “Load Setup Defaults”. Selecting this option will reset your computer’s BIOS or UEFI settings to their defaults.
Changing BIOS or UEFI Firmware Settings
Computers with a BIOS usually have the text-mode interfaces you can navigate with the arrow keys, and using the Enter key to select options. Some modern PCs which come with UEFI have graphical interfaces that can be used to navigate with a mouse and keyboard, but even with UEFI, many computers continue to use text-mode interfaces. Whatever mode you use to navigate and select options, you should only change settings if you know exactly what you are doing. Be careful with the BIOS or UEFI settings screen - it is possible to make your system unstable/unusable or even cause hardware damage by incorrectly changing certain settings, especially those related to overclocking. For example, if you change your boot priority and remove your hard drive from the list of boot devices, your computer won’t boot the operating system you have installed until you fix the boot order. See more.
Please, always check help information displayed somewhere on your PC screen to learn about what each option actually does before taking any action. If you do not get enough help, please consult the manual or help website for your PC.
How to Boot Your Computer From a USB Drive or CD
Usually, computer boots from its main hard drive, which contains the operating system (e.g., Windows). But occasionally, you may need to boot from a CD, DVD, or USB drive, this is especially if you are running a recovery program, or testing out a new operating system such as Linux. In order to achieve this, you need to tell your computer’s BIOS/UEFI to load the operating system from a different device than usual. There are two ways for doing that.
Firstly, by changing the boot order in the BIOS/UEFI firmware to make it attempt to boot from CD or USB every time. Secondly, by accessing a boot menu on startup so it only boots from CD or USB at that one time. The first method is permanent until you change it again, and exists on every computer, but, the second method is faster, although it may not exist on every computer.
Changing Your Computer’s Boot Order
Depending on how new your computer is, the boot order is controlled in your computer’s BIOS or UEFI firmware.
As previously seen, you will need to restart your computer and timely press a specific key at the start of the boot process for the computer BIOS to appear. This key is generally displayed on the screen during the boot process. If you don’t see the required key on a displayed screen, consult your computer’s manual or Google for your computer’s model name and the respective BIOS key. See under "How to Access Your BIOS or UEFI Firmware Settings" above how to reboot Windows into a special boot options menu on a PC with UEFI firmware, which is often found in most recent PCs that shipped with Windows 8 or 10. These PCs may not provide options to press a certain key at boot to access this menu.
Once you are in the BIOS or UEFI firmware menu, look for some Boot options menu. There might be a tab at the top of the screen named Boot. If not, this option may be located beneath another tab. Use the arrow keys to navigate through the BIOS. Press Enter to select something. Some modern computers with UEFI firmware may allow you to use a mouse on this screen, too.
Locate the boot order screen that lists the boot devices. This may be on the Boot tab itself or beneath a Boot Order option. Select an option and press Enter to change it, which may be to disable it or specify another boot device. You can also use the + and – keys to move devices up or down in the priority list.
Note that if we connected a USB device to the computer before starting the computer and access the boot order options screen, we can see the USB drive option in the list. Some computers display the USB drive option even when a drive isn’t connected, while some don’t.
The boot order is a priority list. For example, if the USB drive is above hard drive in your boot order, your computer will first boot from the USB drive and, if it’s not connected or no operating system is present, it will then boot from the hard drive. Remember to save changes and exit, and restarting to commit them. The computer will then boot using your new boot order priority once you restart it in the next time.
How to Access Computer’s Boot Menu (If It Has One)
To reduce the need to change your boot order, some computers have a boot menu option which can be accessed by pressing the appropriate key, often F11 or F12 while booting your computer. This allows you to boot from a specific hardware device once without changing the boot order permanently.
Again, most recent PCs that shipped with either Windows 8 or 10 use UEFI. You can choose a boot device from the advanced boot options menu.
From within Windows, press and hold the Shift key and click the Restart option in the Start menu or on the sign-in screen. Your PC will restart into the boot options menu. Select the Use a device option on this screen and you can choose a device you want to boot from, such as a USB drive, DVD, or network boot. See more.
Which way to Install Ubuntu?
Depending on the boot mode, you can either use Universal USB Installer (BIOS compatible) or Rufus (UEFI compatible) for creating a bootable USB disk. Rufus is a program that allows you to create a bootable USB drive from an .iso file.
If installing Ubuntu 18.04 alongside Windows (say Windows 10) in UEFI mode, you will need to set up your firmware (BIOS) to boot the disk in UEFI mode. Note that sometimes even if your PC boots the USB stick in UEFI mode, it might boot the HDD in Legacy BIOS mode (and the contrary).
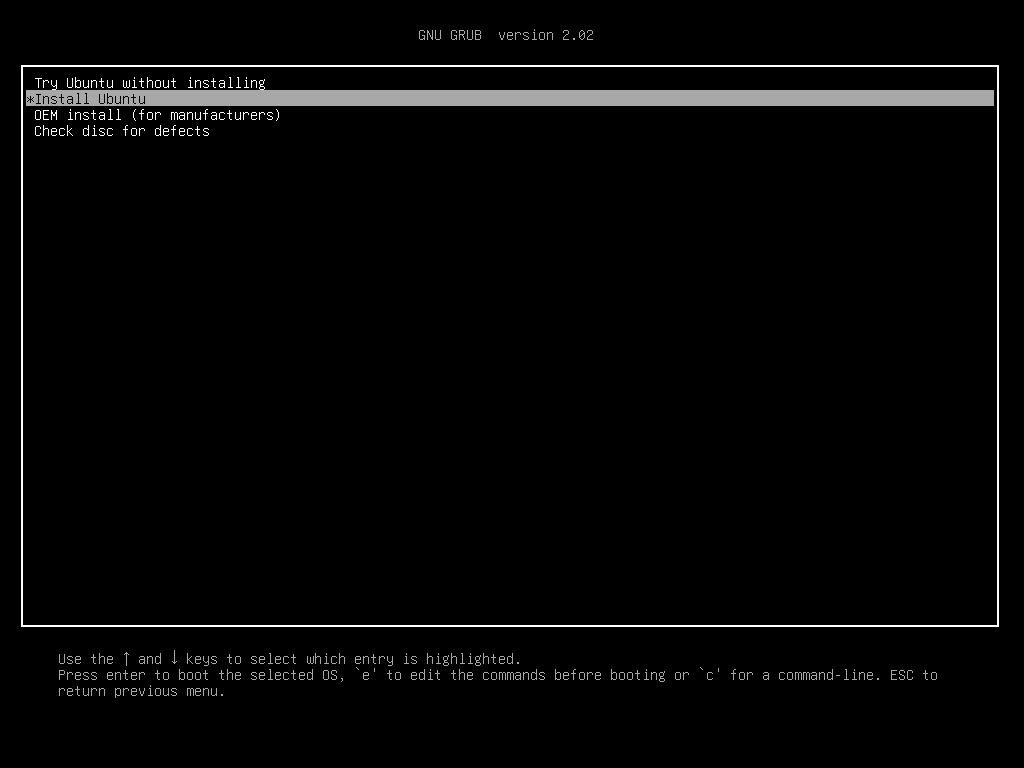
When booting on a 64-bit Ubuntu disk, if the BIOS is set up to boot the USB stick/CD in UEFI mode, then you will see the screen similar to this one:

If the BIOS is not set up to boot the USB/CD in UEFI mode, or if the disk is not 64-bit, then you will see the screen similar to the one below:

Deciding on the boot mode to use depends on several factors:
- Boot mode matching: If you are dual-booting with another OS, the two OSes' boot modes should match. Most computers that ship with Windows 8 and later use UEFI to boot that OS, so this configuration dictates the use of UEFI mode when installing and booting Ubuntu.
- Hardware support : Some hardware devices work better in one mode or the other, traditionally, BIOS mode is better supported. This type of problem is becoming less common.
- Boot loader problems: Sometimes a boot loader for one mode works better than a boot loader for another mode. BIOS-mode boot loaders are better tested and are therefore less likely to pose problems.
Case when Ubuntu must be installed in UEFI mode
Having a PC with UEFI firmware does not mean that you need to install Ubuntu in UEFI mode. What is important is below:
- If the other systems (Windows Vista/7/8, GNU/Linux...) of your computer are installed in UEFI mode, then you must install Ubuntu in UEFI mode too.
- If the other systems (Windows, GNU/Linux...) of your computer are installed in Legacy (not-UEFI) mode, then you must install Ubuntu in Legacy mode too. This is usually the case if your computer is old (<2010), is 32-bits, or was sold with a pre-installed Windows XP.
- If Ubuntu is the only operating system on your computer, then it does not matter whether you install Ubuntu in UEFI mode or not. Follow these general guidelines for installing Ubuntu as a sole operating system, and find out how to use New Partition Table option to create custom partitions (check here too). However, look at disk space and required partitions.
Install Ubuntu 18.04 Alongside With Windows 10 in Dual Boot
Step 0: Make a backup (Optional)
Depending on how important are your files, it is always recommended to make a backup. This will save you greatly in case something goes wrong.
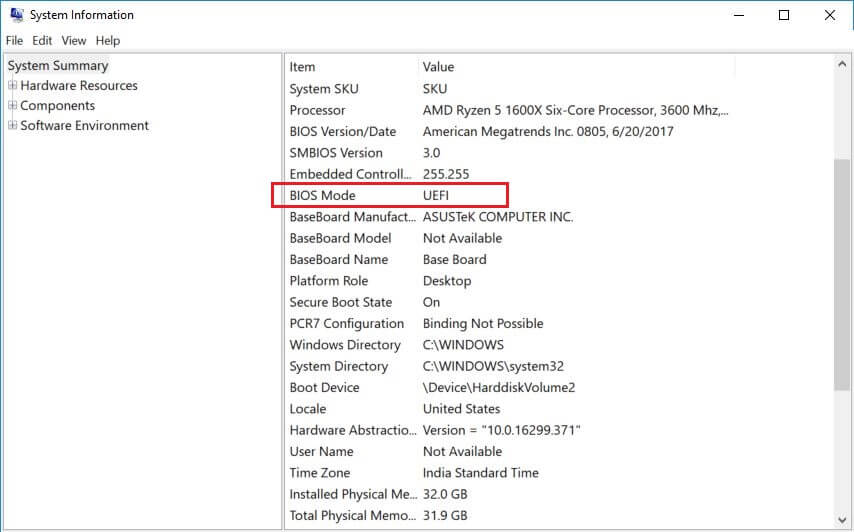
Step 1: Check UEFI or BIOS
First, you need to check if your Windows is using UEFI or legacy BIOS and it is crucial for creating a bootable USB stick. Press Win + R and type msinfo32 and then hit Enter or follow instructions given previously to check the computer mode. You may need to consult your respective computer manual to find out how to check and switch between the two modes if everything else described here does not work. Look for BIOS/UEFI Mode entry in the system information window.
Change to the BIOS or UEFI mode as described previously or by your PC manual based on which mode you want for installation.
Step 2: Prepare Windows System for Dual-Boot
In most of the cases, machines are shipped with a pre-configured Windows operating system with normally the whole disk used for OS partition. So, machines will not have any free/unallocated disk space for creating a partition for Ubuntu 18.04 installation. If your system has enough unallocated space then you can skip this step and directly start Ubuntu 18.04 installation.
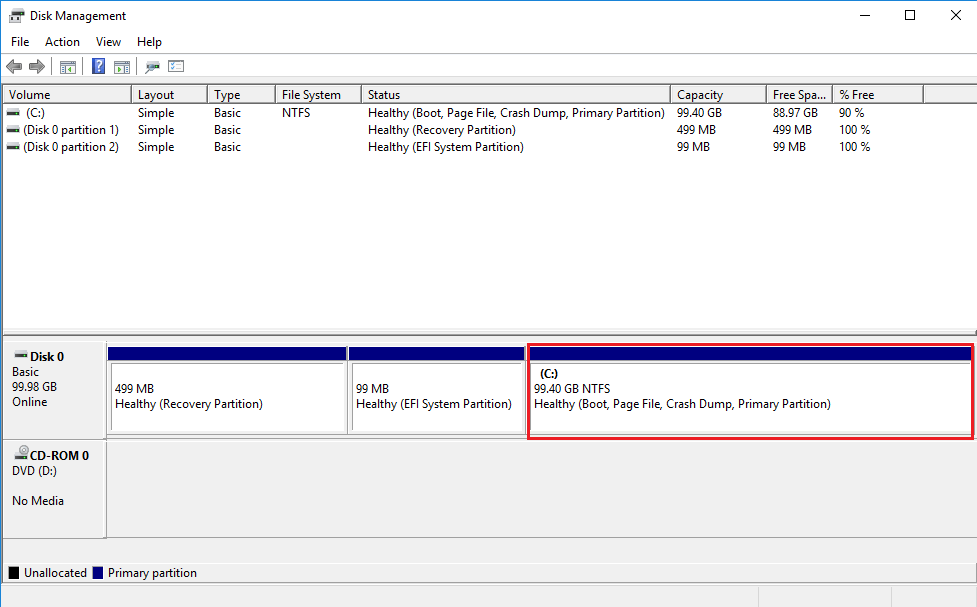
We assume that your system has no free/unalloacated space, so the first thing is to create some free disk space on the HDD for Ubuntu 18.04 installation. To do so, on the Windows OS, press Win + R, then, type diskmgmt.msc to open Disk Management utility. Or open a Command Prompt window with admin rights and execute diskmgmt.msc command to open Disk Management utility.
Since the machine has only one partition, i.e. C drive, we will shrink it to free space for Ubuntu installation.
Consider shrinking (or deleting if necessary) the last partition in case the system has more than one partition. Warning: If you have several partitions of considerable size, use any of them except C drive because it may erase the data.
There might be more than one NTFS (or FAT 32) partitions (i.e. drives in Windows term) on your hard disk, usually one of them will consist of Windows installation (C:). You can delete an NTFS or existing ext4 partition and create some free space. This will delete all the data in that partition and that is why it is important to verify if you have Windows installed in a different partition -- do not touch such partition in case you want to retain your Windows installation intact.
To shrink the C drive, right click on C: and then select Shrink Volume to resize the partition. Enter the amount of space in MB and then click Shrink to begin the shrinking operation. As an example, to get a 500 GB free disk space on the 1 TB partition, you would need to enter 500,000 and then click Shrink.
Wait for a few minutes, and you will see an Unallocated Space with a size of 500 GB.
Step 3: Download Ubuntu 18.04 and Create a Bootable USB Stick or DVD
In our case, we will download Ubuntu Desktop ISO image and burn it to create a bootable USB stick using Rufus (UEFI compatible) software, see how to make a bootable USB stick.
Step 4: Boot from USB Stick
To boot from USB, we may choose boot from USB option displayed on the Windows itself or with PC settings for UEFI mode by pressing the Shift key while clicking on Restart.
Insert the USB stick on the system and then reboot/restart the machine, change the boot sequence on BIOS/UEFI to boot a system from USB by pressing appropriate key, which may be F1, F2, F10, F11, F12, Esc, DEL or a different key. Read your PC manual for more information.
Step 5: Try or Install Ubuntu 18.04 LTS
Based on your Windows machine, you may need to disable Fast startup/boot (for quick boot) and Secure boot for your OS. To disable fast boot in Windows 10 (optional), go to Control Panel -> Hardware and Sound -> Power Options -> System Settings -> Choose what the power buttons do and uncheck the Turn on fast startup box. In many cases, secure boot can be disabled in UEFI.
Once the system boots up, the grub boot screen will appear on your machine. Select Try Ubuntu without installing or Install Ubuntu from the menu and then press Enter. If you boot with the UEFI mode, the screen will look like:
Wait for few minutes to let the media load into memory and bring up the Ubuntu Live system. Follow the obvious instructions appropriately.
Step 6: Disk Partitioning
Installation type is the most important step during the Ubuntu installation. Select Install Ubuntu alongside Windows Boot Manager or Something else to install Ubuntu 18.04 along with Windows OS.
Automatic Partitioning
If you choose to install Ubuntu alongside Windows Boot Manager, then, the installer will take care of creating partitions and install Ubuntu 18.04 along with Windows OS. Use this option if you don’t care about the partition layout and its size. But, here, we will choose Something else and create partitions as described below.
In hard disk partition table menu, select the hard drive free space (we previously created by shrinking the C dive) and hit on + button in order to create the Ubuntu partition.
Create Root Partition
After hitting the + sign, in the partition pop-up window, add the size of the root (/) partition in MB, choose the partition type as Primary and the partition location at the Beginning of this space. Next, format this partition with ext4 journaling filesystem and use / as partition mount point. The / (root) partition summary is described below:
- Size: Minimum of 30000 MB (recommended)
- Type for the new partition: Primary
- Location for the new partition: Beginning of this space
- Use as: EXT4 journaling file system
- Mount point: /
Next step is to create swap partition. It is advised by many that Swap should be double of your system’s RAM size. Again, select free space, hit on + button and use the below scheme to create the swap partition:
- Size: 2 x RAM
- Type for the new partition: Primary
- Location for the new partition: Beginning of this space
- Use as: EXT4 journaling file system
- Mount point: swap area
The next step is to create Home by following similar instructions as above. Try to allocate the maximum size to Home because this is where you will be downloading and keeping the files. Use the scheme below to create the /home partition:
- Size: Allocate the maximum/remaining disk space
- Type for the new partition: Primary
- Location for the new partition: Beginning of this space
- Use as: EXT4 journaling file system
- Mount point: /home
Once the installation is complete, restart the computer, you should be welcomed by a purple grub screen -- the GNU Grub menu. In case the Grub menu is not displayed, restart the machine, go to motherboard UEFI settings and change boot order or Boot Options priorities and Hard drive BBS priorities. The settings to enable the Grub menu highly depend on your machine motherboard UEFI settings. In case things do not work as expected, consult your computer's motherboard documentation in order to identify the UEFI and boot priority/order settings and how they can be changed to display the Grub menu.
If the above options do not work, from Windows desktop, hover the mouse in the left corner, right click and select administrator’s command prompt. Then run the following command (do this with great caution):
- bcdedit /set "{bootmgr}" path \EFI\ubuntu\grubx64.efi
Running this command is expected to make the Grub default and hence you can access both Ubuntu and Windows from it.
You can check your system partitions by using the parted command:
- $sudo parted -l
fdisk:
- $sudo fdisk -l
Or something else.
Enjoy